FYI: Alternatives to Raspberry Pi for this hobby

Seeing the low availability :flushed: and (when available) prices :scream: for Raspberry Pi of various models, I set out to look for alternatives that I can get within my limited budget, yet still have a soemthing I can experiment with. Maybe obvious to folks here, but I found that repurposing a thin client meets my needs nicely, and I thought I would share my perceived benefits of experiences here. Definitely not a ‘plug-and-go’ approach, but if one is motivated to dig and learn and has some technology competence, the hurdle is not big, an can be fun, in my opinion.

Kudos to Repurposing Thin Clients for the motivation to collect a LOT of information about the technical aspects of many thin clients - a wealth of information! I settled on a 2014 vintage HP T520 found on ebay for 32USD (delivered, tax included) dual core AMD 64-bit CPU, 4GB memory, GB NIC, 4 USB 2.0, 2 USB 3, and added a used M.2 64GB flash (SSD) drive for 20USD (delivered, tax included), and a USB wireless dongle for 5USD (delivered, tax included).

I chose to use diet-pi (debian 11) for my foundation, installed the 64-bit versions of dump1090-fa, piaware (special thanks @abcd567 - https://github.com/abcd567a/debian ) and tar1090/graphs1090 (special thanks @wiedehopf - wiedehopf · GitHub )

Here’s the ‘status’ where everything is running:
image

The not-so-good:

  • package is larger than a cased Pi (or other single board computer)
  • ‘only’ two CPU cores, AMD CPU
  • trouble figuring out how to get CPU temperature collected in graphs1090
    power consumption (measured with Kill-A-Watt) is about double that of a Pi running dump1090-fa and piaware (Pi 3B+ is about 3.5 watts, thin client 8 watts)

image

The good:

  • fits my limited [wife-friendly] budget (spent 57USD total initial outlay)
  • available ‘now’
  • temporarily defer a few bits of electronic waste from the landfill
  • solid case (no exposed components to worry about) included and power supply included (no more undervoltage issues)
  • FANLESS (quiet!)
  • battery-backed up real time clock
  • no SSD card wear to worry about (can actually have a REAL database on the unit)
  • performance and resource consumption is indistiguishable from a Pi, as I see it

image
as measured from inside the house.

I am happy with the unit’s performance and am planning to replace a Pi that is currently running Home Assistant simply to relieve the sandpapering of its SD card.

Performance was reasonable (in my opinion) when I installed a ‘full’ workstation (MXLinux-21 64-bit https://mxlinux.org/ or Debian11 (bullseye) tested) before I wiped those out and did a simple headless installation for dump1090-fa and piaware.

If you haven’t already considered it, I recommend a look at these bargains (relative to current supply/prices) for affordable, comptetent, compact performers for our ‘technical’ hobby. I already am planning trying these for things like SDR++ server, NAS (attach TB storage to USB 3), and loading up applications (add MQTT, NodeRed, etc.) on to the Home Assistant app. Limited only by one’s imagination, supply, and budget, of course :slight_smile:

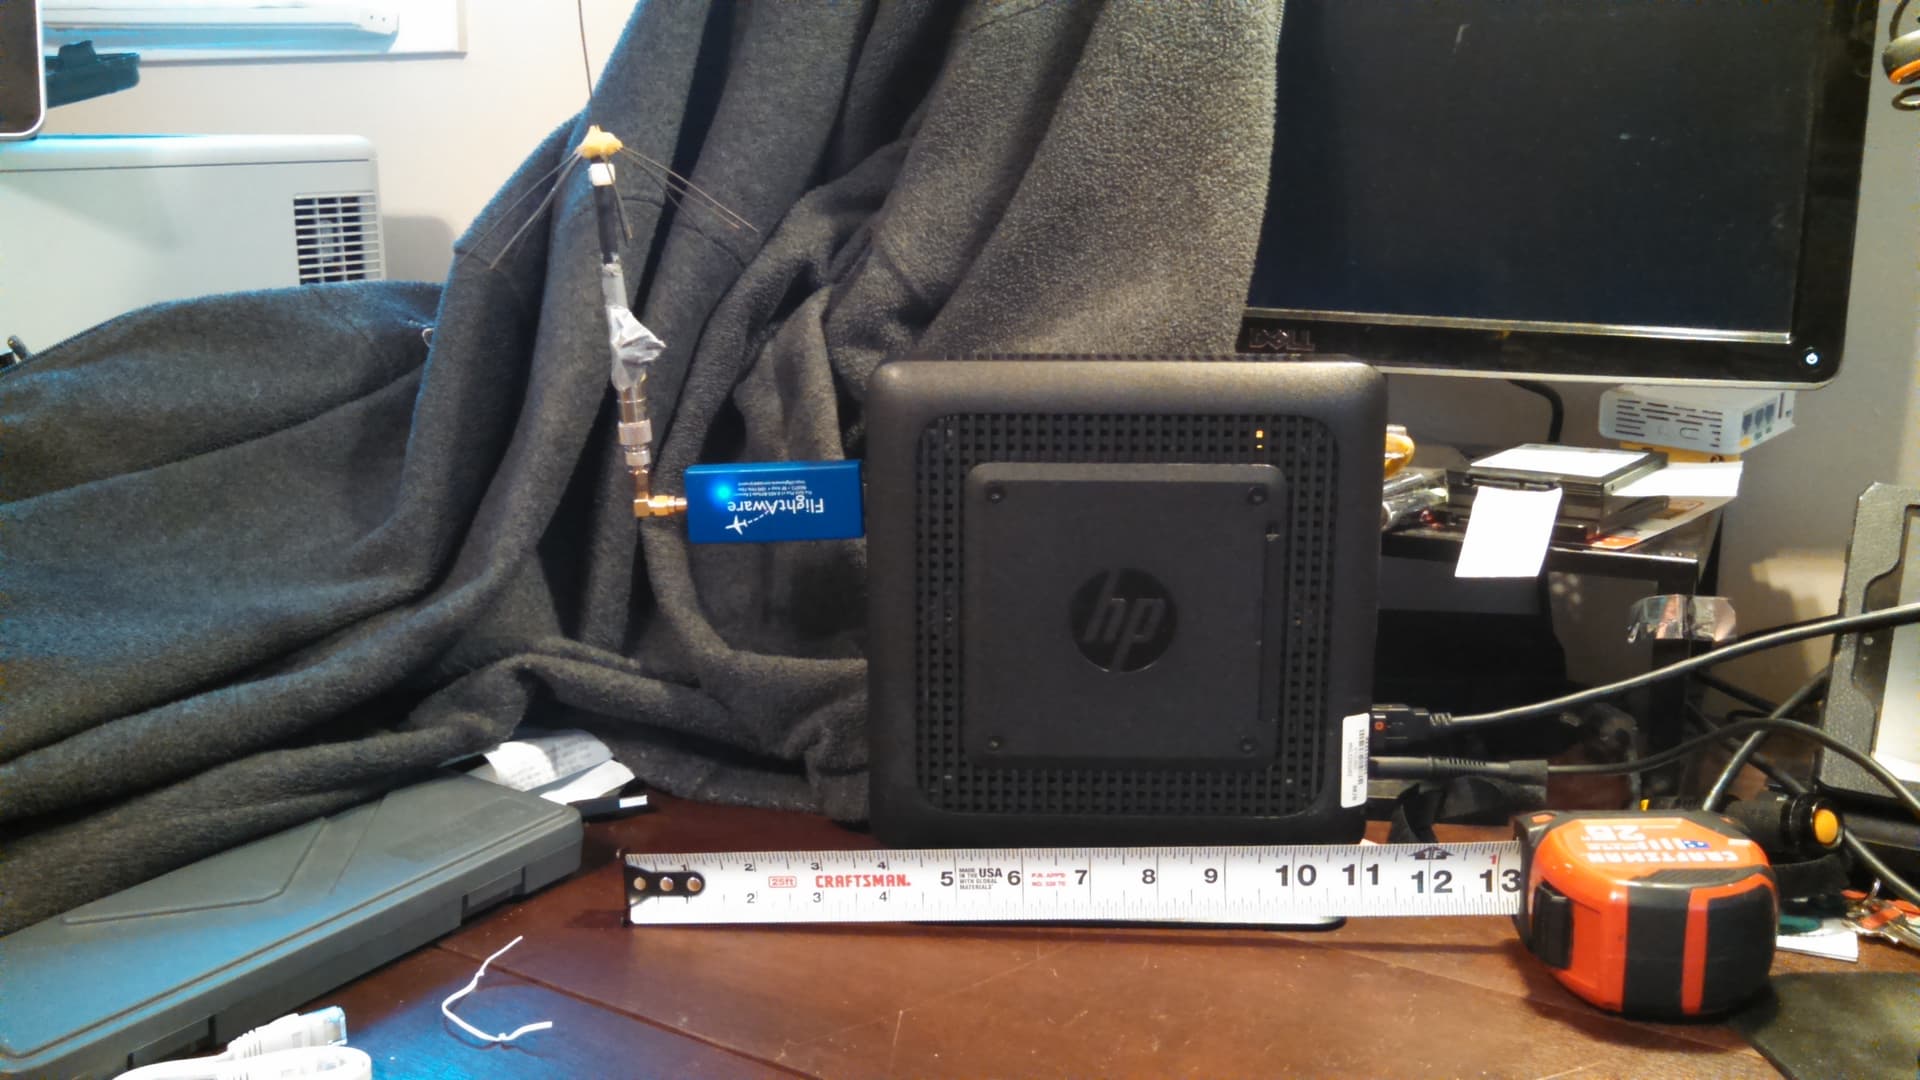
Here’s what it looks like:

10 Likes

Mine is running on a i5-8400 Linux box running Debian Bullseye with Linux 5.16.15, the latest kernel at the time. I didn’t own a RPi when I implemented my feeder and since this box runs 24/7 it was the obvious choice. It’s also runs Homeassistant, Mosquitto MQTT broker, Zoneminder, MythtTV, Kodi, holds all the audio/video media and serves as my build machine. Now I do have a RPi 4 because I needed to run a docker container which was available only in ARM architecture. The Pi runs Debian Bullseye ARM64 Linux 5.16.15 headless from a USB 3.0 SSD, no SD card involved.

As for getting your CPU temp, try changing this line in graphs1090/collectd.conf:

‘/sys/class/thermal/thermal_zone0/temp’

to point to the location of your CPU temp. It will likely be under ‘/sys/class/hwmon/hwmonX/temp1_input’ but you’ll have to search for it.

3 Likes

Cheap Orange PI One.

If you want to send data only to adsbexchange or use localy, then I managed to use an old router with a USB port and Openwrt.

P.S. It is also possible to use an Android TV box or an old smartphone.

4 Likes

I am running a Dell Optiplex 9020 Micro with Intel i5 at 2.0GHz, 8 GB RAM, 128GB SATA SSD, 2 SDR’s listening to UAT and ADS-B, and running Ubuntu 20.04 LTS Server (64-bit).

2 Likes

Are decoders & data feeders for Android available?

1 Like

Good idea :+1:

But why Adsbexchange only, why not other tracking sites?

Avare ADSB receiver works good

2 Likes

Because adsbexchange only needs a simple script

ash ./root/combine1090.sh
#!/bin/sh

SOURCES=192.168.0.119
# Example: SOURCES= 127.0.0.1 192.168.2.23
# this would combine the data from receivers running on 127.0.0.1 and 192.168.2.23

# which ports to collect beast data from (for piaware/dump1090-fa this is 30005 for ADS-B and 30105 for MLAT)
PORTS=30005

PORTSMLAT=30106


#where the data shall go, for display under /combine1090 leave it as is.

while true
do
 	ADSBX="feed.adsbexchange.com:30004"

 	echo "Redirecting: SOURCE: $SOURCES:$PORTS TARGET: $ADSBX"
 	socat $opts -u TCP:$SOURCES:$PORTS,$tcpopts TCP:$ADSBX,$tcpopts
 	echo "Lost Connection: SOURCE: $SOURCES:$PORTS TARGET: $ADSBX"
        
 	sleep $retry
 	sleep 30

done &


while true
do
	sleep 1024
done&

wait
exit 0


1 Like

Not gonna be the case in the future … first of all this doesn’t provide MLAT and secondly no ID being sent before the data which is becoming more and more necessary.

1 Like

A month ago it worked specifically - My receiver data was displayed on https://globe.adsbexchange.com/ but on the page ADSBexchange Anywhere there was a message "No beast data detected from "

@AhrBee
Thanks for posting in detail about your experiment / venture. It is quite promising, alluring me to try it myself. :+1: :slightly_smiling_face:
Hope others who have tried it will also post their experience in this thread.

Cool. I love it when folks can find a good use for some of the technological detritus the world produces. I don’t want to think about how many thin clients are tossed out every year. This gives me something to think about for future projects. Thanks for sharing!

1 Like

@AhrBee
You allured me into this.

HP t520 G9F10AT Flexible Thin Client AMD GX-212JC 1.2GHz 16GB SSD 4GB RAM

Order total:
Price US $29.99
Shipping US $18.10
Total paid US $48.09

EDIT:
It is a used unit. Upon delivery will know in what condition (good / bad) it is. Awaiting delivery. As new thin-clients are in price range of $300, considered trying this used $48 one worth a gamble. :wink:


2 Likes

Great price on a find that includes SSD! Especially since there’s a Windows10 license included as well (if one chooses to use it for that).

Here are a few things to note if one has never taken one of these apart or tried to boot one.

BIOS

Hit ESC key during startup - menu of function keys:

F1 - System information
F2 - System diagnostics
F9 - Boot device options
F10 - BIOS setup

USB - what’s accessible at power up

image
Logitech dongle in one of those spots works for wireless KB/Mouse. Or plug in a USB keyboard. Either slot is usable for boot/KB and both at the same time. Other USB 2.0 and 3.0 ports visible after boot, but NOT useable for boot or KB.

Opening the case

There’s a special way to push open the cover: video here or couple of screen shots:
image
image

Flash/storage

Search for SSD M.2 2242 or 2260 form factor at 64GB or larger.

1 Like

Like @abcd567 I, too, am awaiting delivery of a thin client which the original post inspired me to buy. HP T620 with SSD, RAM and PSU included and currently running WES7. At 32 euros it seemed like too good a deal to pass up.

1 Like

Does this include shipping? If not, how much shipping you paid?
For my order, it was cost of item ($29.99) + shipping ($18.10), i.e. shipping was almost 2/3 rd of cost of item. :slightly_frowning_face:

I am planning to keep original 16 GB SSD with Win10, and plugin a 32 Gb USB flash memory stick (which I already have) burned with with debian 11 amd64 (bullseye) for ADSB.

By changing boot sequence, I can boot into either Linux or Windows.

P.S. @AhrBee: What are the plus & minus points of using a USB flash memory stick plugged into USB port as boot device instead of a regular SSD?

If it had included shipping at 32 euros it would have been outright theft. Shipping was extra - 1/2 the cost at 16 euros. Being eBay I could have put in a lower bid to see if the seller would accept it, but decided to just pay the advertised price. Even with the shipping for me it was good value for a project to have fun with.

Same here :slightly_smiling_face:

If one sets up the boot sequence to USB first, then SSD, and configures the Linux USB stick grub menu to have the Linux and Windows items (Linux as default), it makes for a truly fun setup, in my opinion. I use an older laptop with a similar setup, it has room for both on-board M.2 flash and SATA SSD for those occasions when I need to be completely portable. My boot order is USB stick (whatever happens to be set up on it), then SSD (Linux desktop), then M.2 flash. USB stick and SSD both have grub menus set up. If the USB happens to be removed, then it will simply boot whatever is on the internal SSD, since it does not know about grub.

The grub menu setup is optional, but it seems to avoid needing to access the BIOS boot order when you want to change things.

The benefit to me is having set up several USB sticks with various flavors of Linux distributions or special apps and simply plug in whichever one suits the particular need at the time. That leaves me a couple of USB slots to populate with RTL SDRs or other devices as needed for the application.

Remeber that the thin client (HP T520) has only two USB slots that will recognize the USB to boot from, and these are USB 2.0 speeds. There are the two USB 3.0 ports to use for speedy storage after boot if needed.

1 Like